Innovation Portal Pilot Project - Information and Instructions
The goal of the next few steps is to create a standard template using the WEEBLY drag-and-drop tools to get you familiar with the system we are building for the INNOVATION PORTAL. Like a science fair presentation board, all judges, and reviewers will be counting on seeing work organized in the exact same format described below.
If you have any questions about obtaining your own class account or building this template, please email the Innovation Portal Project Director, Mark Schroll at [email protected].
If you have any questions about obtaining your own class account or building this template, please email the Innovation Portal Project Director, Mark Schroll at [email protected].
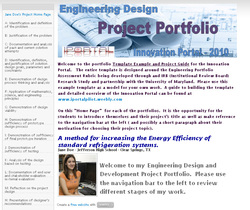
Before you begin,click this link to see what we are trying to "build" http://markschroll.weebly.com
When complete your "template should have the exact look,navigation bar, and header graphic like the picture to the right.
When complete your "template should have the exact look,navigation bar, and header graphic like the picture to the right.
STEP 1:
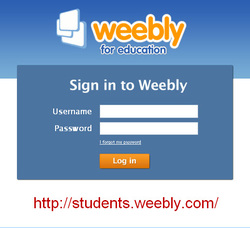
Make sure your teacher has given you a WEEBLY account with your username and password.
Login to your new account at http://students.weebly.com/
( If you are a teacher and do not yet have a "teacher/ account to be able to created student accounts, please contact Mark Schroll at [email protected])
Make sure your teacher has given you a WEEBLY account with your username and password.
Login to your new account at http://students.weebly.com/
( If you are a teacher and do not yet have a "teacher/ account to be able to created student accounts, please contact Mark Schroll at [email protected])
STEP 2:
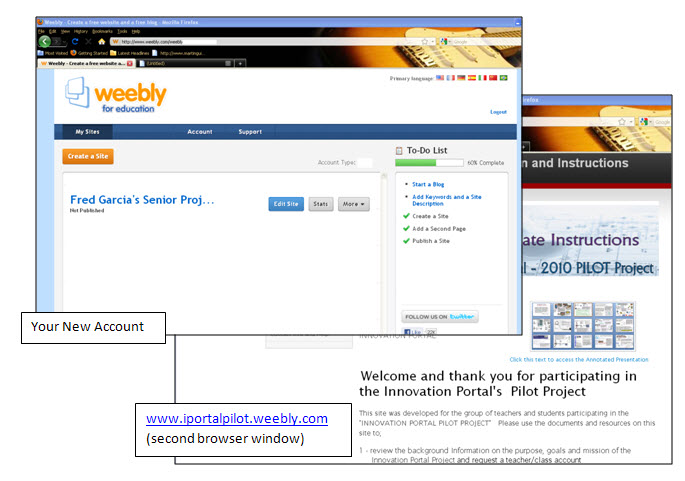
Open a SECOND browser window so that you can go back and forth from your account to this guide.
Open a SECOND browser window so that you can go back and forth from your account to this guide.
STEP 3:
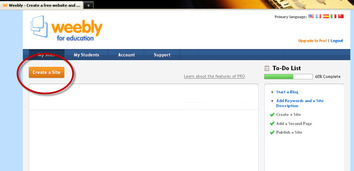
In your account browser window...Click "New Site"
In your account browser window...Click "New Site"
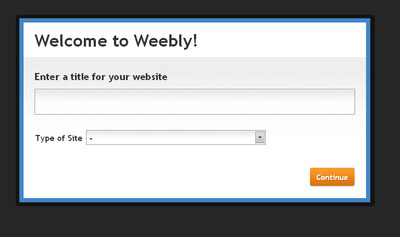
STEP 4:
Enter a title for your website. Use something descriptive and logical, like “Fred Garcia’s EDD Project”. You can change this anytime if necessary.
You can leave the "Type of Site" blank for now and change it later. Click Continue
Enter a title for your website. Use something descriptive and logical, like “Fred Garcia’s EDD Project”. You can change this anytime if necessary.
You can leave the "Type of Site" blank for now and change it later. Click Continue
NOTE: After clicking continue you will be asked to create a "link name” for your
site that will end in ".weebly.com".
This will be the web address assigned to your site. Be professional, descriptive and relatively
short. (you won't be able to change this later) Use just letters, no spaces,
hyphens, periods or underscores. This is
the only chance you will have to create your link name, so choose carefully!

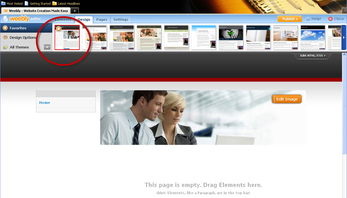
Step 5:
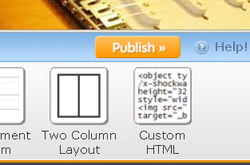
Click the “Design” tab and scroll back and forth until you find and select the layout shown in the image at right…it’s the only one with two people in the picture.
Click the “Design” tab and scroll back and forth until you find and select the layout shown in the image at right…it’s the only one with two people in the picture.
Step 6:
Create the Page Names / Navigation Bar exactly as per the following instructions.
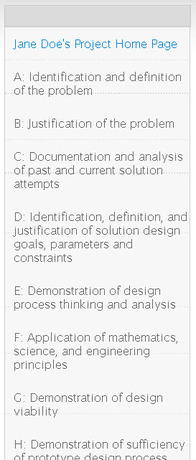
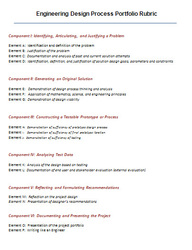
A: Identification and definition of the problem
B: Justification of the problem
C: Documentation and analysis of past and current solution attempts
D: Identification, definition, and justification of solution design goals, parameters and constraints
E: Demonstration of design process thinking and analysis
F: Application of mathematics, science, and engineering principles
G: Demonstration of design viability
H: Demonstration of sufficiency of prototype design process
I: Demonstration of sufficiency of final prototype iteration
J:Demonstration of Sufficiency of Testing
K: Analysis of the design based on testing
L: Documentation of end user and stakeholder evaluation (external evaluation)
M: Reflection on the project design
N: Presentation of designer’s recommendations
Third Party Project Reviews and Recognitions
Create the Page Names / Navigation Bar exactly as per the following instructions.
- Click on the tab labeled “Pages”
- Create a new page by clicking the orange button labeled “ New Page” then either type OR copy the page names from the list below and paste them into the “Page Name” field. Click “New Page after you paste each new title.
- Once you have built all of the page titles click “Save” to return to the main construction page.
A: Identification and definition of the problem
B: Justification of the problem
C: Documentation and analysis of past and current solution attempts
D: Identification, definition, and justification of solution design goals, parameters and constraints
E: Demonstration of design process thinking and analysis
F: Application of mathematics, science, and engineering principles
G: Demonstration of design viability
H: Demonstration of sufficiency of prototype design process
I: Demonstration of sufficiency of final prototype iteration
J:Demonstration of Sufficiency of Testing
K: Analysis of the design based on testing
L: Documentation of end user and stakeholder evaluation (external evaluation)
M: Reflection on the project design
N: Presentation of designer’s recommendations
Third Party Project Reviews and Recognitions
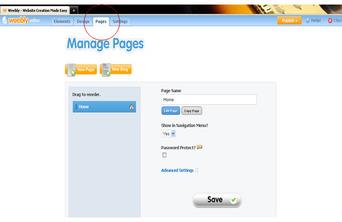

ABOVE: a Picture of what the finished "Page Names" or Navigation Bar of the template will look like In the page creation function. Below is a graphic of what the navigation bar should look like after clicking SAVE.
Step 7:
Add the Innovation Portal Header Graphic
To create the INNOVATION PORTAL Project Portfolio Header above:
1 - RIGHT Click on the image to the right.
2- Save it to your hard drive
3 - Hover you mouse icon over the current header picture in your portfolio and click the orange button "Edit Picture" then Delete the default Picture
4 - Upload the saved file and stretch it to fit the window

Step 8:
Click the orange PUBLISH button to save and publish your website. (Remember your work will be password protected so you are only creating a site that you can see) The first time you do this you will be asked to create a "link name” for your site if you were not asked after entering your project title. ( See the note after step 4)
Click the orange PUBLISH button to save and publish your website. (Remember your work will be password protected so you are only creating a site that you can see) The first time you do this you will be asked to create a "link name” for your site if you were not asked after entering your project title. ( See the note after step 4)
Step 9:
That is it for the template.
Now it’s time to experiment with all the tools available to add content to the different pages of your website. Remember, anytime you’ve added content to your site, be sure to click the PUBLISH button to save and publish (to a password protected site) what you added.
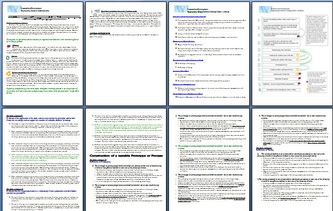
Use the Assessment Rubric materials (to the right) as a guide to help you complete each page. You can also use the following guide/example as a resource. http://markschroll.weebly.com/
That is it for the template.
Now it’s time to experiment with all the tools available to add content to the different pages of your website. Remember, anytime you’ve added content to your site, be sure to click the PUBLISH button to save and publish (to a password protected site) what you added.
Use the Assessment Rubric materials (to the right) as a guide to help you complete each page. You can also use the following guide/example as a resource. http://markschroll.weebly.com/
Click the above graphic(s) to open:
The Full EDPPSR Assessment Rubric and/or The List of Rubric Elements. Use these documents as a guide to help you decide if you have presented enough information in each area.
The Full EDPPSR Assessment Rubric and/or The List of Rubric Elements. Use these documents as a guide to help you decide if you have presented enough information in each area.
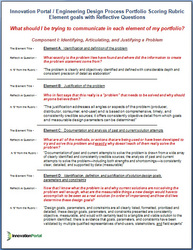
Click the above graphic(s) to open:
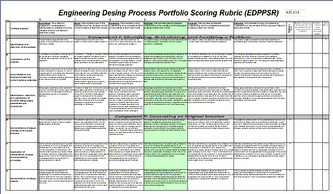
The Rubric in Excel and/or Reflective Questions for Each Element of the Rubric for Students
The Rubric in Excel and/or Reflective Questions for Each Element of the Rubric for Students